You want the whole sales team to know right away when a deal moves to closed won, including people who never open HubSpot, through Slack. This article explains how to send deal stage changes to Slack, starting with the official features.
If you use workflows on a paid HubSpot plan, the official "Send a Slack notification" is enough in many cases. You can insert deal properties and send to a channel or to the deal owner. The reason to use Samurai App is when you want to add an AI summary or classification before the notification.
Conclusion
- For notifications only, use the official action: Place the Slack notification action in a HubSpot workflow. It requires a Professional plan or higher
- To add an AI summary: Call a Samurai App external trigger from "Send a webhook" in a HubSpot workflow, summarize with "Generate with AI," and send it to Slack with "Send to notification target." It requires Data Hub Professional or higher
- A service integration needs developer setup: The reason is in the next section. This article's steps use the external trigger route
What You Can and Cannot Do
Here are the three routes compared.
| Point of comparison | Official Slack notification | Send a webhook + external trigger | Service integration |
|---|---|---|---|
| Requirements on the HubSpot side | Professional or higher, with workflows | Data Hub Professional or higher | A developer app ID and a developer API key |
| What arrives | The properties you choose | The properties you choose, or all properties | The deal ID and similar |
| AI summary | Not included | Can be included | Can be included if you look the deal up again by ID |
| Actions via buttons | Creating notes, updating deals, and so on | Not possible | Not possible |
The service integration offers two events: Deal Stage UpdatedTrigger (HUBSPOT_DEAL_STAGE_UPDATED_TRIGGER) and Contact Created Trigger (HUBSPOT_CONTACT_CREATED_TRIGGER). Both require app_id and developer_api_key under "Filter," so you need a HubSpot developer app. Only objectId, subscriptionType, and subscription_id arrive, without the deal name. This is not something sales or operations staff can set up themselves, so this article does not cover its steps.
Here is what you cannot do.
- Act on deals from Slack: The external trigger route only sends notifications. If you want to update deals with buttons, use the official action
- Send every update in a large batch at once: External triggers can be started up to 10 times per minute by default. Calls beyond that are refused with 429. Step 6 below limits the number of runs on the HubSpot side
- Receive all properties as is: The body of an external trigger is limited to 64 KiB. Deals with many properties can exceed it, so send only what you need
What You Need
- HubSpot with Data Hub Professional or higher, and permission to edit workflows
- The URL of a Slack Incoming Webhook
- Manager or higher permissions in Samurai App. Only managers and above can add an external trigger to a workflow
Steps
When finished, the workflow looks like this.
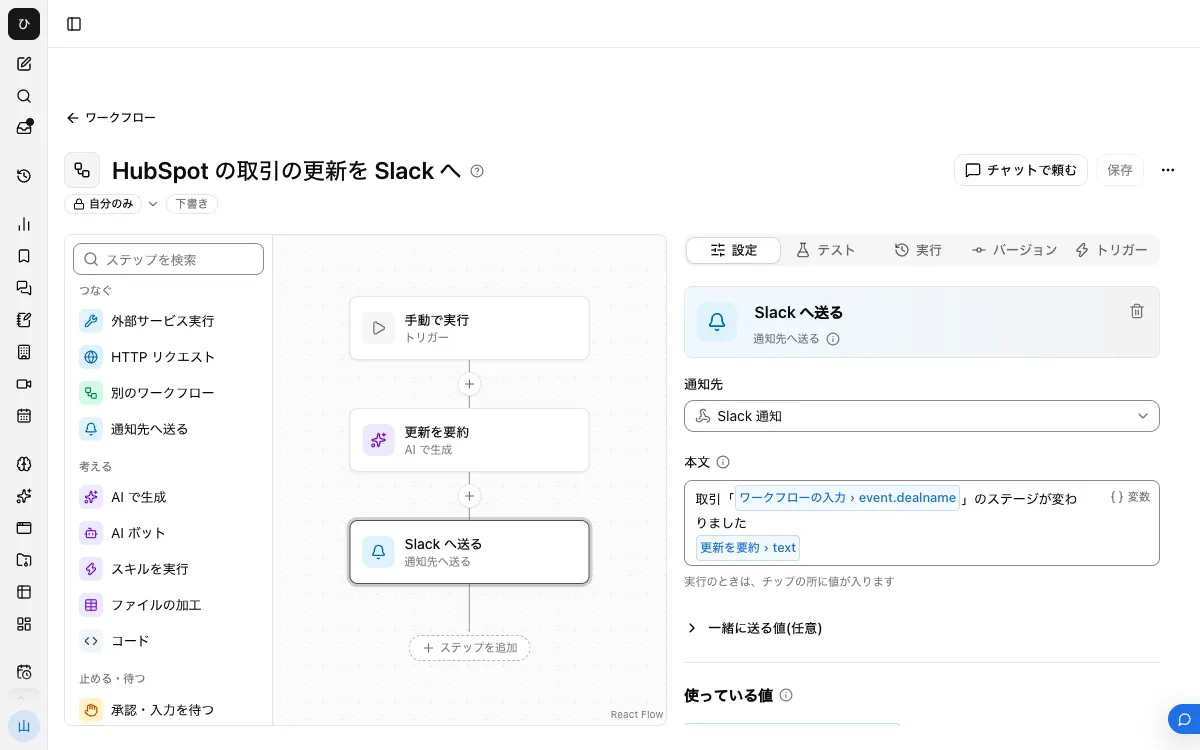
1. Register the Notification Target
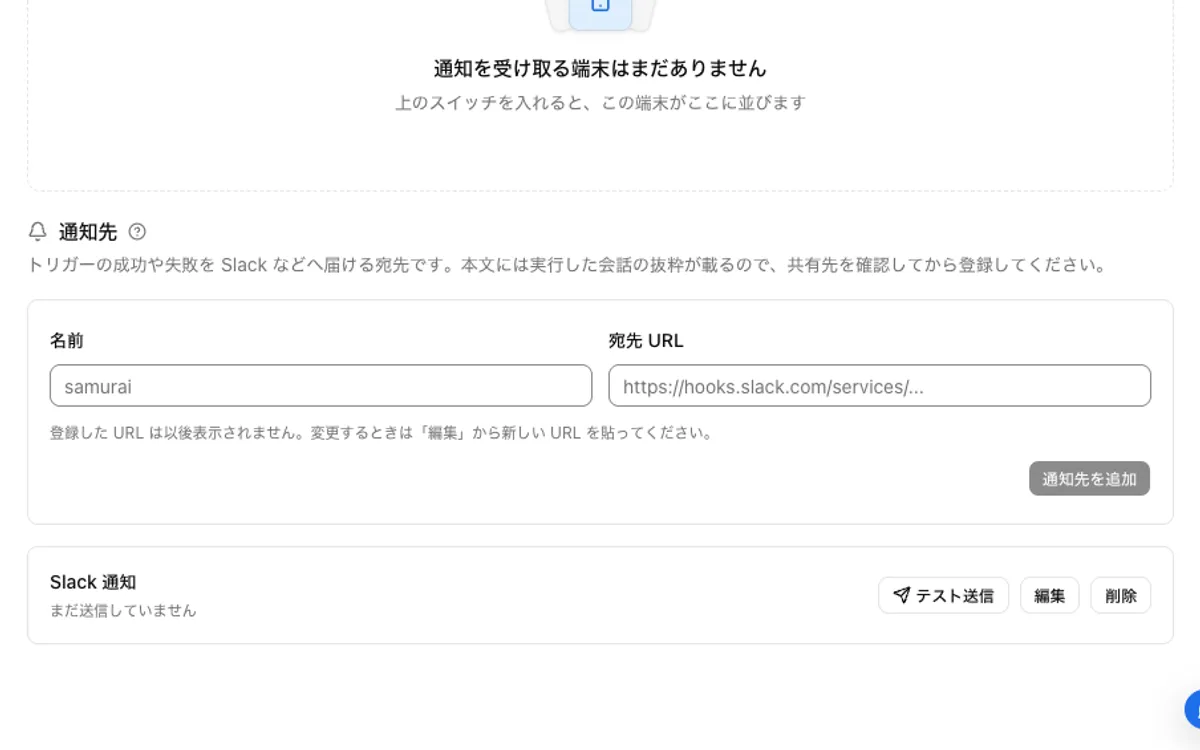
Create an Incoming Webhook URL in Slack. In Samurai App, go to "Notifications" in "Settings," enter a "Name" and the "Destination URL," press "Add notification target," and check it with "Send test."
2. Create the Workflow
Create a draft with "New" in "Workflows," and with no step selected, press "Add input field" under "Settings." Name it event and set its type to "Group of fields." The body HubSpot sends goes into this event.
In the "Instructions" of "Generate with AI," write the following.
Summarize the following HubSpot deal information in two sentences for the sales team.
{{input.event}}
In the "Body" of "Send to notification target," write the following. Choose text from the "Generate with AI" step in the list that appears when you type /.
The stage of deal "{{input.event.dealname}}" has changed
{{choose the AI's text}}
Match dealname to the name you give it in the HubSpot body in step 4. If that field is missing from what arrives, the step fails. It is not sent blank. For fields that may be empty, such as the amount, it is safer to pass them to the AI than to insert them directly into the "Body."
3. Publish and Issue an External Trigger
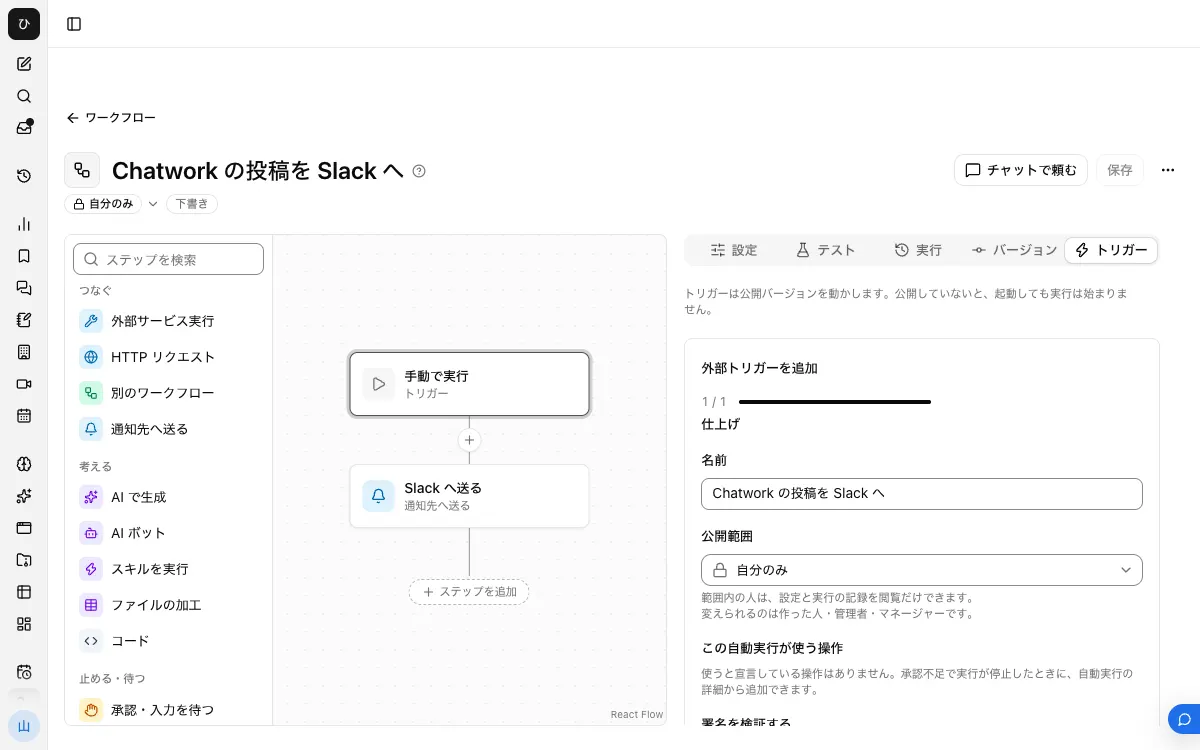
After "Save," press "Publish version N" on the "Versions" tab. If you call it while unpublished, it is refused with "This workflow has not been published yet. Publish it before running it."
On the "Triggers" tab, press "Add external trigger" and register it. A URL and a secret appear. The secret is shown only once, right after it is created, so note it down here.
4. Call It From a HubSpot Workflow
In HubSpot, create a deal-based workflow and set the enrollment trigger to a change in the deal stage property. If you want only the closed won stage, specify the value here.
Add a "Send a webhook" action and set it up as follows.
- Method: POST
- Webhook URL: The URL issued in step 3
- Authentication type: API key. Key name
Authorization, location Request Header, valueBearer <secret> - Body: Choose "Customize request body," set the key to
dealname, and insert the deal name property. Add the amount and owner the same way
5. Test It
Run a test from the HubSpot workflow screen, or change the stage of a test deal. A row is added under "Recent runs" on Samurai App's "Runs" tab, where you can read each step's input and output. Check here what shape the HubSpot body took in event, and fix the notation in the "Body."
6. Limit the Number of Runs
When many deals move through a CSV import or bulk edit, calls exceed 10 per minute. HubSpot's "Send a webhook" has a setting that caps the number of executions per period of time (off by default). Keeping it to 10 per minute or fewer is safe.
When HubSpot receives a 429 response, it retries. Failed webhooks are retried for up to 3 days. It does not retry on 4XX responses other than 429, so a wrong secret is not fixed by retries.
When It Doesn't Work
- HubSpot's test returns 404: The secret is not arriving. Check that the "Authorization" value starts with
Bearer - It returns 422: The workflow is not published. Publish it on Samurai App's "Versions" tab
- The "Send to notification target" step fails: A field you inserted is not in what arrived. Check the input under "Recent runs"
- Messages reach Slack only sometimes: Calls may be exceeding 10 per minute, returning 429 and waiting for HubSpot's retry. Check the HubSpot workflow's log
Frequently Asked Questions
Can I get notifications on the Starter plan?
Both the official Slack notification workflow and "Send a webhook" assume Professional or higher. First check whether user notifications in HubSpot's Slack app are enough for you.
Can I get notifications for new contacts too?
You can call it from a contact-based workflow with the same steps. Change the body's keys to contact properties, and update the "Body" in "Send to notification target" to match.
What if I cannot put the secret in a header?
If you turn on "Also accept the secret via ?k= in the URL" when registering the external trigger, you can call it by appending ?k=<secret> to the URL. It is off by default. Since the URL remains in logs, try sending it in the header first.
Related Use Cases
- Send new Salesforce leads to Slack
- Send kintone updates to Slack
- Send Notion page creations and updates to Slack
Sources
- Use Slack workflow actions (HubSpot Knowledge Base)
- Manage notifications in Slack (HubSpot Knowledge Base)
- Use webhooks with HubSpot workflows (HubSpot Knowledge Base)
- Sending messages using incoming webhooks (Slack)