When you stream Jira updates into Slack, every edit adds a notification, and the status changes that matter can get buried. This article explains how to send to Slack only when a status changes, with the issue's content summarized briefly by AI.
If you use Jira Cloud and just want to choose the conditions for notifications, Atlassian's official Jira Cloud for Slack is enough. Filtering with JQL is also possible in the official app. The reason to use Samurai App is when you want an AI summary or classification before the notification.
Bottom line
- For notifications only, use the official app: run
/jira connectin a channel and filter by work type, priority, and event type. Space admins can also filter with JQL from the space settings (Notifications) - To add a summary, use Samurai App: receive Jira events through a service integration, summarize with "Generate with AI," and send to Slack with "Send to destination"
- One thing to watch out for: issues the connected account cannot open in Jira may also arrive. Limit the destination channel to people who are allowed to see the issues
What you can and cannot do
Of the events you can choose, the ones related to issues are the following. All of them arrive as soon as the event happens.
| Name on screen | Identifier | When it arrives |
|---|---|---|
| Issue Created | JIRA_ISSUE_CREATED |
An issue was created. Includes subtasks |
| Issue Updated | JIRA_ISSUE_UPDATED |
A field on an issue changed |
| Comment Created | JIRA_COMMENT_CREATED |
A comment was added |
| Sprint Started | JIRA_SPRINT_STARTED |
A sprint started |
| Version Released | JIRA_VERSION_RELEASED |
A version was released |
Issue Updated has three behaviors that affect the steps.
- One per edit: even if you change the assignee and due date at the same time, only one arrives
- Comments do not trigger it: if you also want to be notified of comments, register a separate Comment Created trigger
- It also arrives for the parent issue: creating a subtask counts as an update to the parent issue, so the parent's Issue Updated also arrives
The issue triggers have the following fields under "Filters."
| Field | Required | What to enter |
|---|---|---|
project_id |
Required | The project's numeric ID. Not a key like ABC |
changed_field |
Optional (Issue Updated only) | The field that changed. status, assignee, priority, duedate, and so on |
status |
Optional | The status name |
issue_type |
Optional | The issue type name |
assignee / reporter |
Optional | The Atlassian accountId. Names and email addresses cannot be used |
Here is what you cannot do.
- Filter with JQL: a service integration's "Filters" has no JQL field. If you want fine-grained JQL filtering, the official app is the better fit
- Act on issues from Slack: "Send to destination" only sends. Creating or updating issues from Slack is a feature of the official app
- Receive events at no cost: each event received costs about ¥0.5. This is the same even when nothing runs. "Filters" do not necessarily reduce the cost, so watch the volume on busy projects
What you need
- A Jira Cloud account that can view the project you want notifications for
- A Slack Incoming Webhook URL
- Manager or higher permissions in Samurai App
Steps
When finished, the workflow looks like this.
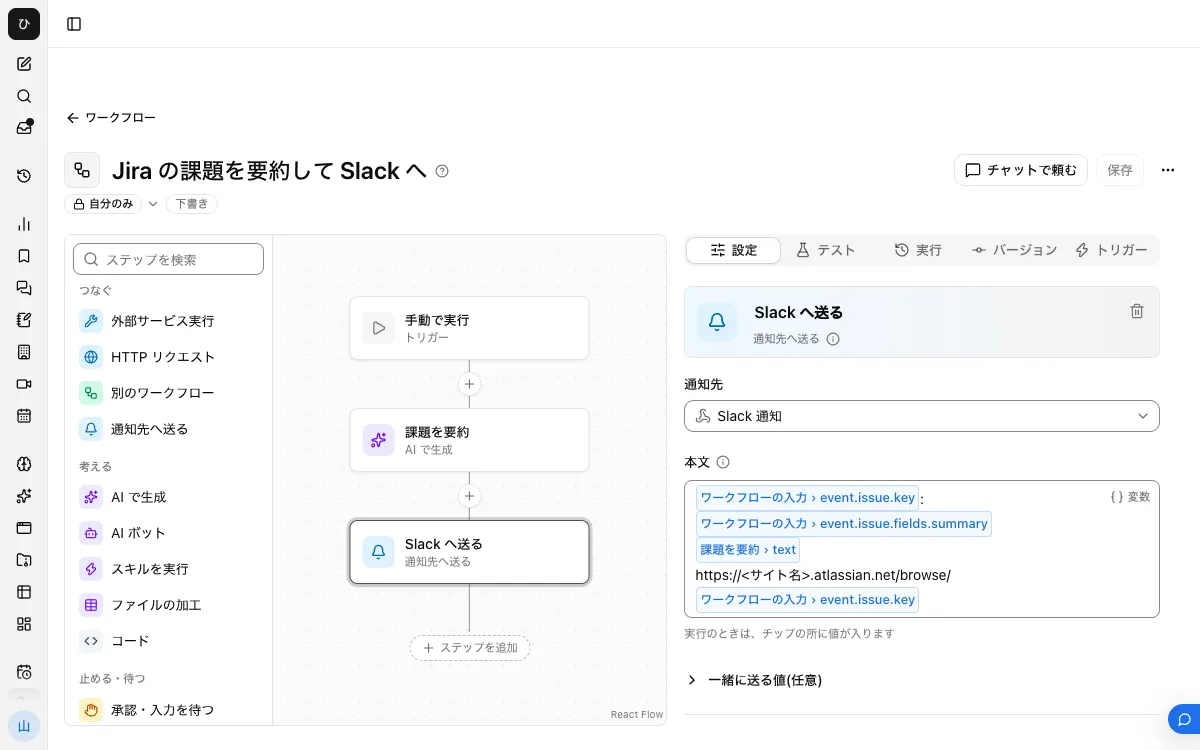
Here we build "when the status changes, summarize the issue in 2 sentences and send it."
1. Find the project's numeric ID
In a browser signed in to Jira, open the following URL. Replace <site-name> and <key> with your own.
https://<site-name>.atlassian.net/rest/api/3/project/<key>
The "id" near the top of the returned JSON is the number to enter in project_id. This API requires permission to view the project.
2. Register the Slack Incoming Webhook as a destination
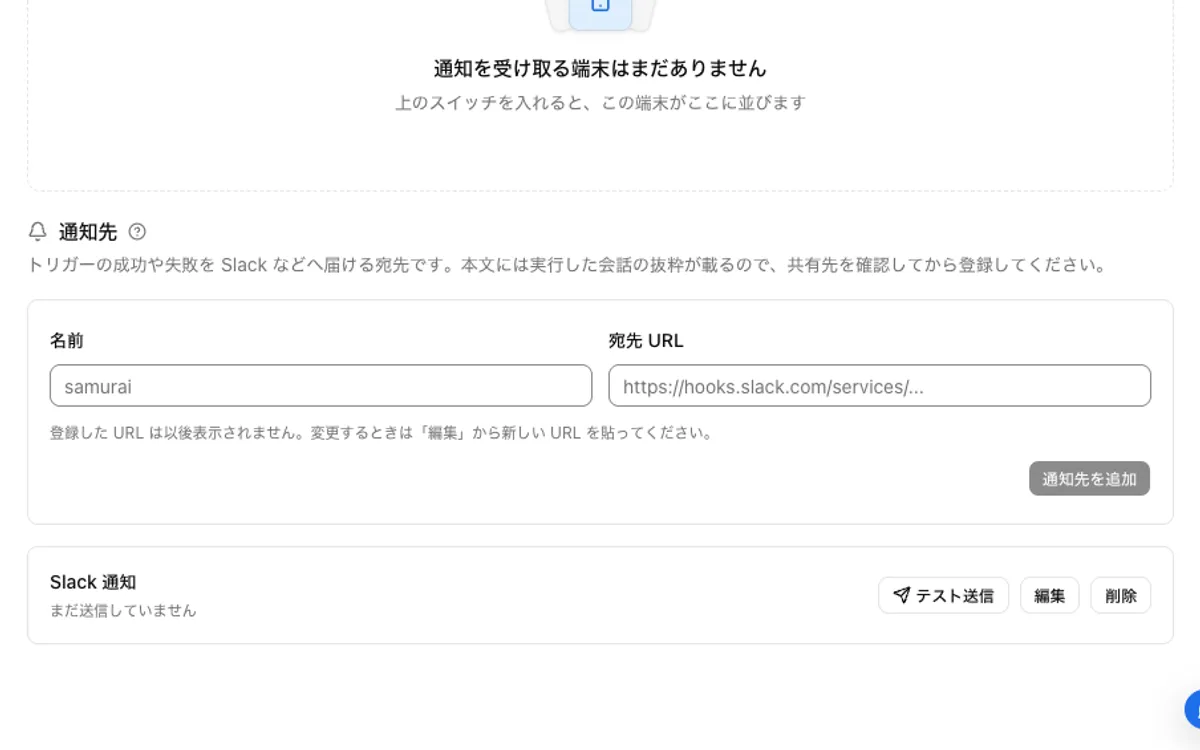
Create an Incoming Webhook URL in Slack, then in Samurai App's "Settings" > "Notifications," enter a "Name" and "Destination URL" and press "Add destination." Confirm it arrives with "Send test."
3. Connect Jira
On the "Connectors" tab at /settings/connections, add Jira and sign in through the browser. Events are received with the permissions of the account connected here.
4. Build the workflow
Create a draft with "New" in "Workflows," and with no step selected, press "Add input field" in "Settings." Set the name to event and the type to "Group of fields." The contents of Issue Updated go into event.issue (the issue), event.changelog (what changed), and event.user (the person who made the change).
In the "Instructions" of "Generate with AI," write something like this.
Summarize the following Jira issue update in 2 sentences so that it is clear what changed and who does what next.
{{input.event}}
In the "Body" of "Send to destination," write the following. From the list that appears when you type /, choose text from the "Generate with AI" step.
{{input.event.issue.key}}: {{input.event.issue.fields.summary}}
{{choose the AI text}}
https://<site-name>.atlassian.net/browse/{{input.event.issue.key}}
issue.key and issue.fields.summary are standard fields of a Jira issue. If an inserted field is not in the content that arrived, that step fails. It is not sent with a blank. It is safer not to insert fields that can be empty, such as the assignee, and to pass the whole thing to the AI instead.
To build it in chat, ask something like, "Create a workflow. The input is event (group of fields). Summarize input.event in 2 sentences with Generate with AI, and send it to the destination 'Dev channel.'"
5. Publish
After "Save," press "Publish version N" on the "Versions" tab. Only the published version runs from triggers.
6. Attach the service integration trigger
Press "Add service integration" on the "Triggers" tab.
- Under "Which service to watch," choose the Jira connection
- Under "When to run," choose Issue Updated
- Under "Filters," enter the number from step 1 in
project_idandstatusinchanged_field
With changed_field set, edits to the description or assignee do not trigger a run. When a single edit changes several fields, it arrives if status is among them.
7. Try it
Change the status of a test issue and open "Recent runs" on the "Runs" tab. You can read each step's input and output, so check here how the fields in event are named.
When it does not work
- It cannot be registered even with
project_identered: check that you did not enter the key (ABC). The numeric ID is required - Changing the status does not trigger a run: match the name entered in the
statusfield to how it appears on the Jira screen.changed_fieldis a field ID, so enterstatusas is in English - The "Send to destination" step fails: an inserted field is not in the content that arrived. Check the names in the input in "Recent runs" and fix the "Body"
- An issue you did not want to show went out: issues the connected account cannot open may also arrive. For projects with narrow visibility, filter with
project_idand check the members of the destination channel
Frequently asked questions
Can I use it alongside Jira Cloud for Slack?
Yes. You can split it so that the official app handles creating issues from Slack, and the workflow sends only the notifications with summaries. To avoid two notifications for the same issue, adjust the official app's channel notifications with /jira manage.
Can I notify only about issues assigned to a specific person?
Enter that person's Atlassian accountId in the assignee field. You cannot specify them by name or email address.
Does it work with Jira Data Center?
This article assumes Jira Cloud. We have not checked whether it works with Data Center.
Related guides
- Summarize GitHub PRs with AI and notify Slack
- Notify Slack of Backlog updates
- Notify Slack when Trello cards move
Sources
- Get Jira notifications in Slack (Atlassian Support)
- Use Jira Cloud with Slack (Atlassian Support)
- The Jira Cloud platform REST API: Get project (Atlassian Developer)
- Sending messages using incoming webhooks (Slack)